Applicant Actions
DC Workflow
| DC workflow | |
|---|---|
| Creating and using a DC template | |
| Sending DC to the beneficiary or issuing bank | |
| Sending an amendment request to beneficiary or issuing bank | |
| Request to Cancel an issued DC |
Presentation Workflow
| Presentation Workflow | |
|---|---|
| View and reply to a Discrepancy Notice | |
| View and download released documents | |
| Send Bill Settlement instructions |
General
| General | |
|---|---|
| Sending a P2P messages | |
| Replying to a P2P message |
Details
Creating and using a DC template
Maker
A DC template is a pre-filled application form. The maker can create multiple templates and re-use any one while creating a DC application. You can fill all fields, or leave some blank to be added while submitting the application.
- On the left menu, click on
Import DCtab. -
Click on
+ Create DCbutton.
-
Click on
Manage Templatesbutton. - Click on
Create templateoption. - You will see a blank DC form. Enter the form values you need in the template.
- Scroll down and click on
Createbutton. - Give a name to your template in the dialog box that appears. If you have several templates, you can select
Prioritize template, so that it shows up at the top of the list. - Click on
Savebutton. The template is saved.
To use a template during DC application
- On the left menu, click on
Import DCtab. - Click on
Createbutton. - Click on the template that you wish to use.
- A DC application form is created, pre-filled with the template values.
- Proceed to fill and submit the application to beneficiary or issuing bank.
Sending a DC application to the beneficiary or issuing bank
Maker
- On the left menu, click the
Import DCtab -
Click the
Create DCbutton- Choose to create a new application from an existing template, recently submitted application, or from scratch with a blank form

- Choose to create a new application from an existing template, recently submitted application, or from scratch with a blank form
-
Fill in the application form for mandatory items or make changes to pre-filled fields from a template or recently submitted application
- Not all fields need to be filled. You can leave some blank if your intention is for the beneficiary or issuing bank to complete some fields
- If the issuing bank is to be authorised to make changes, there is a
tick boxthat must be selected underneath the Issuing bank address box
- If you want to save your work and return to it later, use the
Save Templatebutton.
-
Preview the application
- Once completed, and if the Draft DC form is to be shared with the beneficiary before being submitted to the issuing bank, click
Send to Beneficiarybutton -
If the application is to be submitted to the issuing bank, click the
Submit to Issuing Bankbutton
-
Click the
Sendbutton to confirm. - Leave a Comment (optional). Click on
Post. - Page will redirect to the summary list. The status of DC will be
Draft in progress - Your Checker to review
Note: From 8.1 onwards attaching documents to the application form is disabled and instead can be attached using the Message section to send additional documents to the bank (or any other party).
Checker
- On the left menu, click the
Import DCtab. A list of Import DCs will be shown on the right pane. - Click on the newly created DC. It will be highlighted, with the DC status as
Draft in progress - . Please review. -
Review the DC details. Click on
Send for internal approvalto complete the checker process. To return the draft to the maker, click onReturn internally. A confirmation dialog box is shown.
-
Leave a Comment (optional). Click on
Post. - You will return to the summary listing. The status of DC will be
Draft in progress - Your Approver to review
Approver
- On the left menu, click the
Import DCtab. A list of Import DCs will be shown on the right pane. - Click on the newly created DC. It will be highlighted, with the DC status as
Draft in progress - Your Approver to review. -
Review the DC details. Click on
Submit to Issuing bankto complete the checking process. To return the draft to the maker, click onReturn internally. A confirmation dialog box is shown.
-
Leave a comment (optional). Click on
Post. - You will return to the summary listing. The DC status will be
Application submitted - Issuing bank to review.
Track Changes while co-drafting with Beneficiary/Issuing Bank and returned to Applicant
When there are changes made by the beneficiary while co-drafting or if issuing bank makes changes, the changes can be now seen visible similar to an amendment.
- Track change mode is default 'on', when there are changes made, and the user is allowed to toggle on and off.
- The changes are highlighted similar to an amendment. Deleted or deselected fields/values will be strikedout and appear in red and replaced fields/values will be underlined and appear in red.
- The applicant now has the option to Edit & Send to Beneficiary or Edit & Submit to Issuing bank

Sending a DC amendment request to the beneficiary or issuing bank
Maker
The applicant can initiate an amendment request on an Issued and Advised DC
- On the left menu, click the Import DC tab
-
In the summary listing, click on the DC to be amended.

-
Click on Create Amendment to view the DC details and the DC form is now editable to amend the DC.

-
Update the desired fields to be amended. the options are available to send the changes to the beneficiary by clicking on Send to Beneficiary. If you want to send it directly to the issuing bank, then click on Send to Issuing bank.

-
Once sent, the changes can be viewed in overview, highlighting the old value as
strikethroughfollowed by amended value.
-
The Amendment status will show Draft in Progress - Your Checker to review.
Checker
- On the left menu, click the Import DC tab
-
In the summary listing, the DC being amended will be highlighted. Click to open the DC. You will see an Overview of the amendments done on the DC. Click on the highlighted record.

-
Keep Track changes ON, to see the amended fields in this version.

-
Once the checking is complete, to send it back to the maker, click on Return internally. Add your comments in the confirmation dialog box (optional), otherwise click on Send for internal approval which will return to the summary page. The Amendment status will now show Draft in progress - Your approver to review.
Approver
- On the left menu, click the Import DC tab
- In the summary listing, the DC being amended will be highlighted. Click to open the DC. You will see an Overview of the amendments done on the DC. Click on the highlighted record.
- Keep Track changes ON to see the amended fields in this version.
- Once the checking is complete, to send it back to the maker, click on Return internally. Add your comments in the confirmation dialog box (optional) or click on Send to beneficiary.
-
You will return to the summary page. The Amendment status will show Draft text - beneficiary to review.

-
Instead of sending to beneficiary, if the amendment is sent to the Issuing bank, then the status says Draft text - issuing bank to review.

Request to Cancel an issued DC
Maker
- On the left menu, click the
Import DCtab - In the summary listing, click on the DC to be cancelled.
- Click on
Messagesin the left pane. -
Click on the Pencil icon/Compose Message to create a new P2P message.

-
In the Compose Message Pop-up, select Documentary Credit and click on Compose

-
Select Request for cancellation from the dropdown for P2P message types.
- All parties in the DC will be auto selected, and they cannot be edited.
- Enter additional description in the message text box.
-
Click on
Send for internal approval. Confirm the action in the pop up dialog box.

Checker
The checker receives a notification email when the maker completes an action.
- On the left menu, click the
Import DCtab - In the summary listing, click on the DC to be cancelled.
- Click on
Messagesin the left pane. The request for cancellation will be shown in the right pane. - Review the message and click on
Send for internet approvalto complete action and move to approver. ClickReturn internallyto return it to the maker). - Confirm the action in the pop-up dialog box.

Approver
The approver receives a notification email when the checker completes an action.
- On the left menu, click the
Import DCtab - In the summary listing, click on the DC to be cancelled.
- Click on
Messagesin the left pane. The request for cancellation will be shown in the right pane. - Review the message and click on
Send messageto complete action. ClickReturn internallyto return it to the maker. -
Confirm the action in the pop-up dialog box.

-
The cancel request is now sent to all parties which can be viewed by clicking the messages in the left pane inside the DC.
View and reply to a Discrepancy Notice
If there are discrepancies in the DP presented by the beneficiary, the issuing bank may request for a waiver from the applicant. This is done using a P2P message.
Maker
Refer to maker actions in Replying to a P2P message
Checker
Refer to checker actions in Replying to a P2P message
Approver
Refer to approver actions in Replying to a P2P message
View and download released documents
Once the issuing bank has released documents presented by the beneficiary, the applicant can view and download them on Contour.
All users
Users will receive a notification email when the bank releases the presented documents.
- Click on the
Import DCtab. Select the DC under which the presentation was made. - Click on the relevant presentation (named Presentation 1, Presentation 2 etc). You will see a list of documents under the DP in Contents on the right side and attachments to download in the form.
 3. Click on each document to view the details provided by the beneficiary. If there are any attachments, you will be able to download them also.
Send Bill Settlement instructions
Maker
- Click on the
Import DCtab. - In the summary listing, find and click on the DC for which you want to send bill instructions.
- Under the DC, find the relevant presentation (DP) and in the left pane click on
Messages, then Click on Compose Message. The Compose Message pop-up appears, select the relevant presentation and click on Compose to start the message.
- You will see a list of previous messages(if any), click on the 'draft' icon.
- Select the type of message as
Bill instructions. - Type the recipient names. You can select any party involved in the DC transaction.
- View and update the
Settlement method, if required. Give the settlement amount and other instructions in the provided fields. - If you want to attach any files, use the
Attachbutton.Only PDF with max 7MB is allowed as attachments.
- Click on
Send. - The Checker will be notified via email.
Checker
Refer to checker actions in Sending a P2P message
Approver
Refer to approver actions in Sending a P2P message
Sending a P2P Message
Maker
- Click on the
Import DCtab (if you are an applicant or issuing bank). Otherwise click onExport DCtab. - In the summary listing, find and click on the DC for which you want to send a P2P message.
-
Under the DC in the left pane, click on
Messages. If you want to send a message related to an amendment or a DP, select from drop down the respective transaction type in the Compose Message Pop-up.
-
In the Message Type dropdown, you will see a list of messages, select the appropriate message. The selection of a type from list will auto-populate the subject.
- Select a
General messageif you cannot find a specific appropriate type in the dropdown list and type the Subject. - Select the recipient names under To. You can select any party involved in the DC transaction.
- Type in the message contents.
- If you want to attach any files, use the
Attachbutton.Only PDF with max 7MB is allowed as attachments.
-
Click on
Send for internal approval.
-
The Checker will be notified via email.
Checker
- Click on the
Import DCtab (if you are an applicant or issuing bank). Otherwise click onExport DCtab. - In the summary listing, find and click on the DC for which you want to send a P2P message.
- Under the DC in the left pane, click on
Messages. - Click on the respective message to open.
- You will see the
messagein the right pane with options to Send for internal approval which will proceed the message to Approver and complete action in pop-up dialog box. Otherwise, click on Return internally and add optional reason for return and return the message to Maker for changes if any or to ignore.
- The Approver will be notified via email.
Approver
- Click on the
Import DCtab (if you are an applicant or issuing bank). Otherwise click onExport DCtab. - In the summary listing, find and click on the DC for which you want to send a P2P message.
- Under the DC in the left pane, click on
Message. - Click on the respective message to open.
- You will see the message in the right pane with options to Send message and complete action in pop-up dialog box which will complete and send the message to recipients. Otherwise, click on Return internally and add optional reason for return and return the message to Maker for changes if any or to ignore.

- The recipient parties will be notified via email.
Replying to a P2P Message
Maker
The makers will receive a notification when a P2P message is received by the organisation.
- Click on the
Import DCtab (if you are an applicant or issuing bank). Otherwise click onExport DCtab. - In the summary listing, find and click on the DC in which you want to reply for a P2P message.
- Under the DC in the left pane, click on
Messages. - Click on the new unread message below Compose Message that you want to reply to.
- Type your reply on the Type a message space available in the right side bottom of the page and click on send to proceed.

Checker
- Click on the
Import DCtab (if you are an applicant or issuing bank). Otherwise click onExport DCtab. - In the summary listing, find and click on the DC in which you want reply for a P2P message.
- Under the DC in the left pane, click on
Messages. - Click on the new unread message below Compose Message that you want to reply to.
- The message is displayed in the right pane with Options to Send for internal approval which will move the status of the message to the Approver to review once you confirm the action in the pop-up dialog box. The Approver will be notified via email.
- Otherwise, click on Return internally to return the message to maker for changes once confirm the action in the pop-up dialog box with optional comments for return.

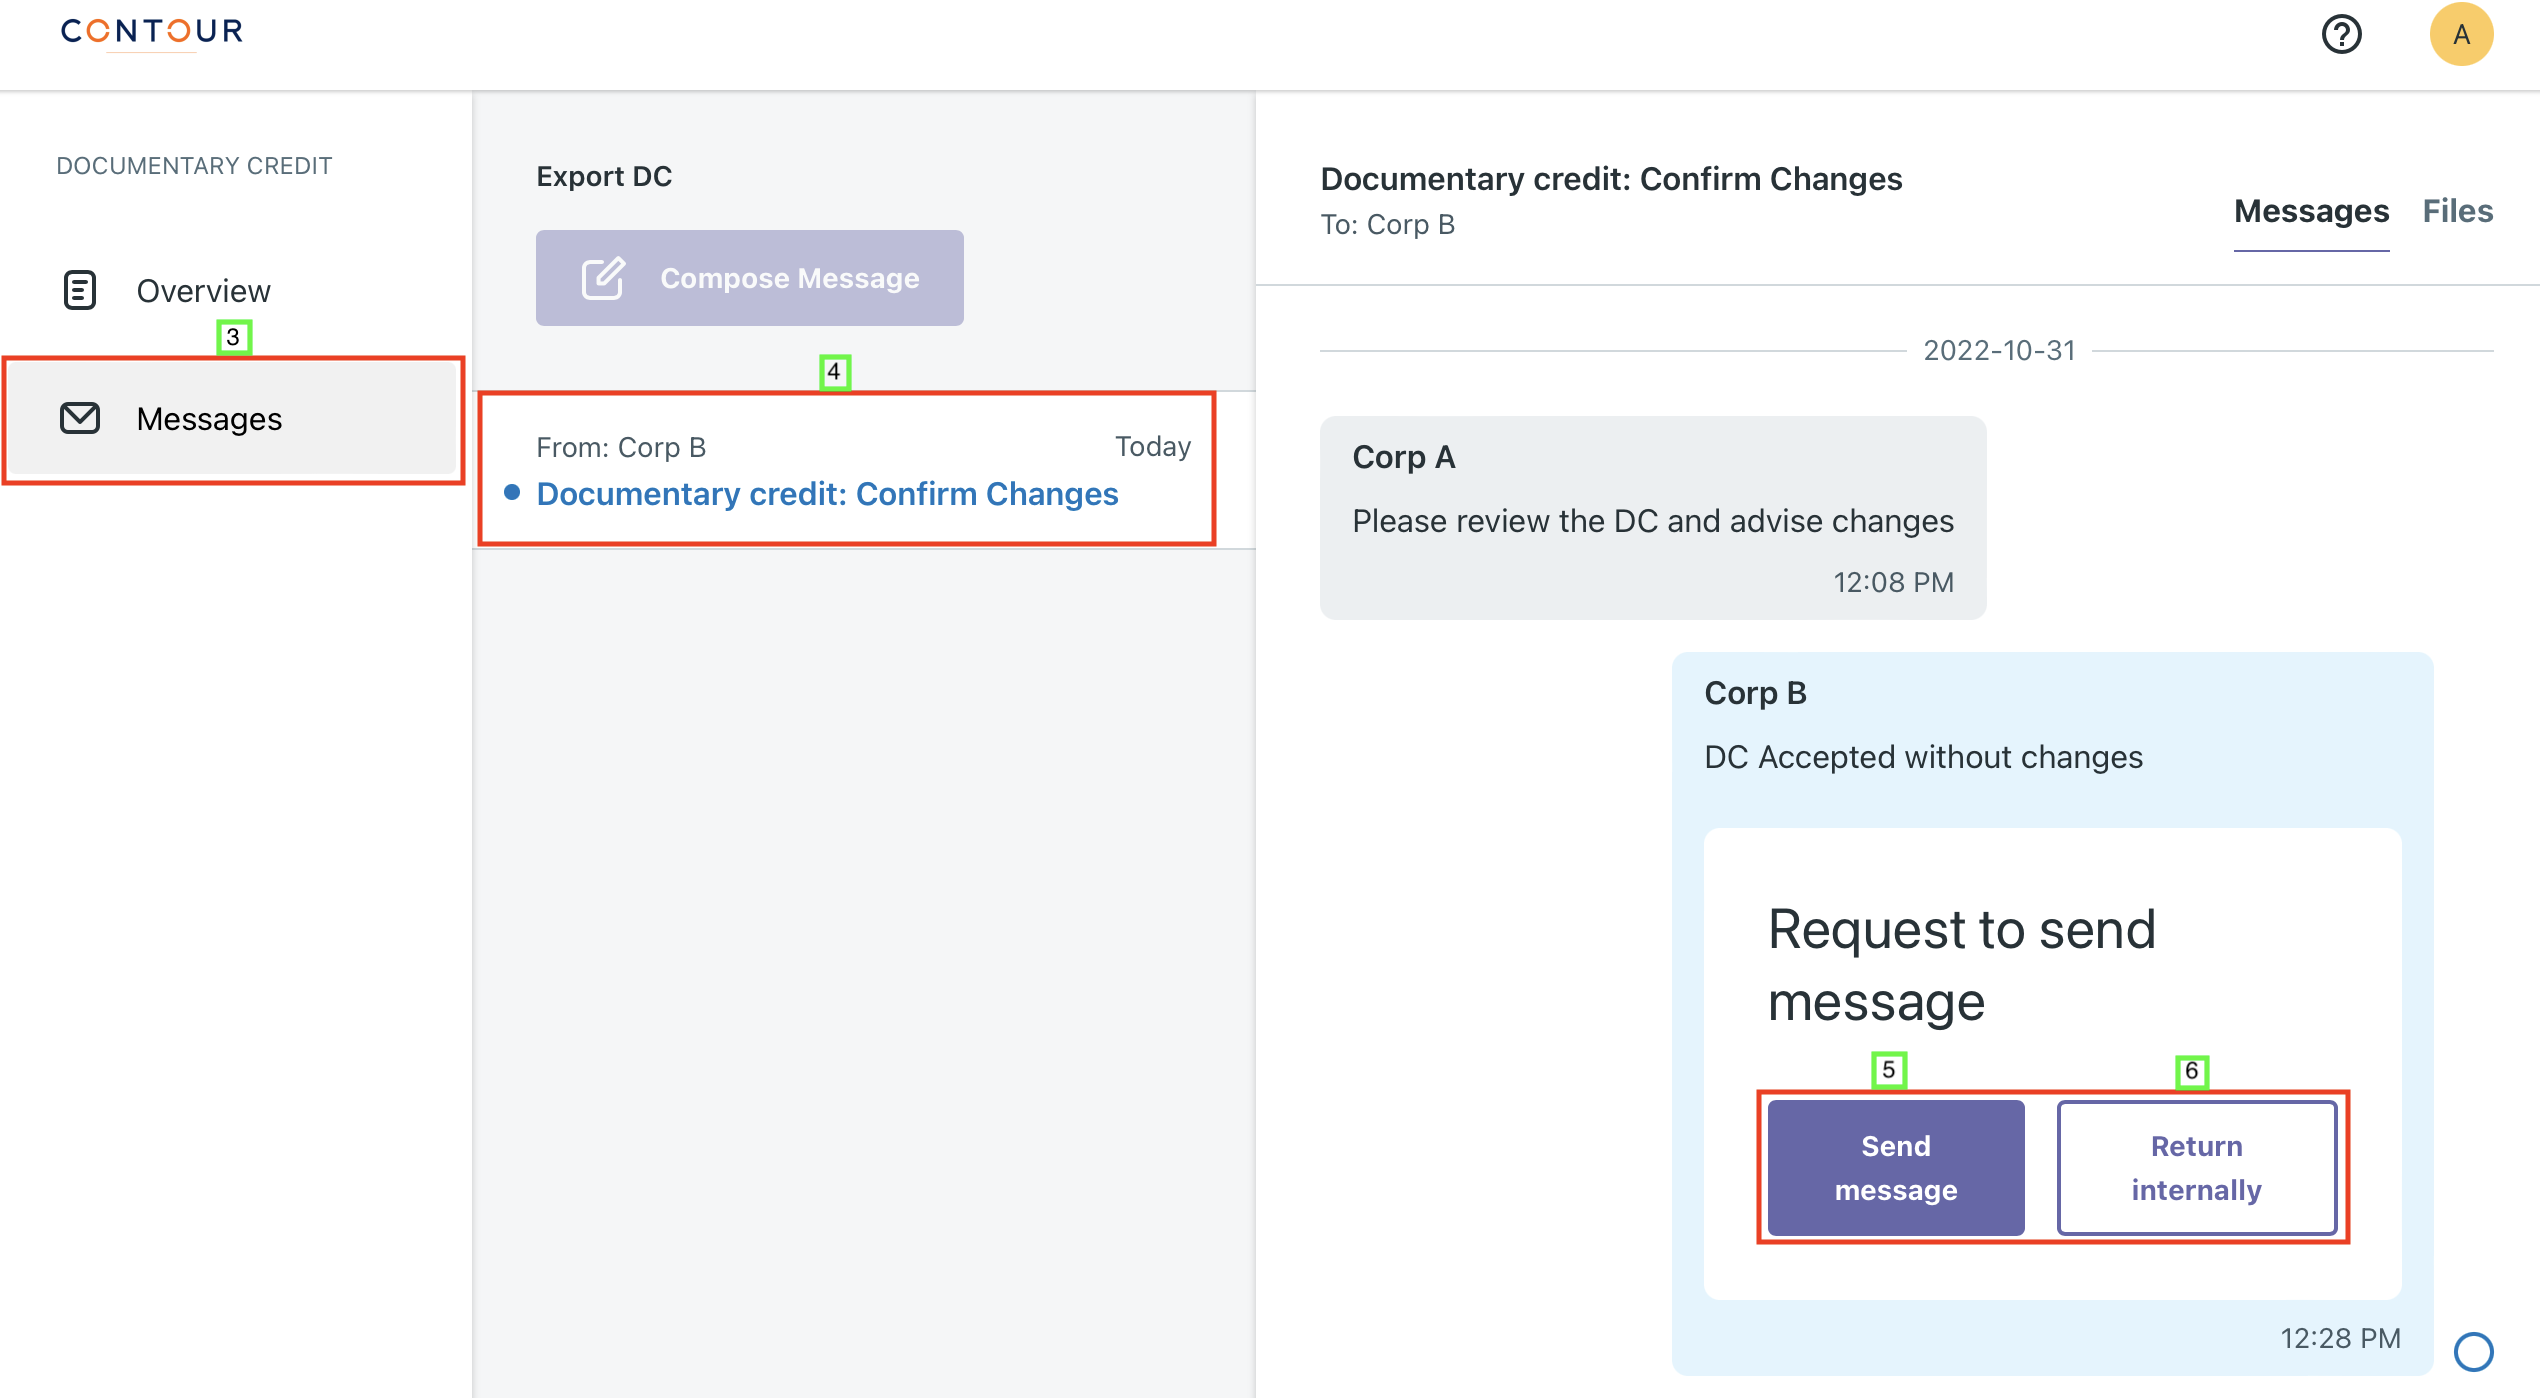
Approver
- Click on the Import DC tab (if you are an applicant or issuing bank). Otherwise click on Export DC tab.
- In the summary listing, find and click on the DC in which you want reply for a P2P message.
- Under the DC in the left pane, click on Messages.
- Click on the new unread message below Compose Message that you want to reply to.
- The message is displayed in the right pane with Options to Send message which will complete and send the message once you confirm the action in the pop-up dialog box. The parties selected will be notified via email.
- Otherwise, click on Return internally to return the message to maker for changes once confirm the action in the pop-up dialog box with optional comments for return.