SSO/SAML2.0 Integration for Cloud Customer
Aligning with SAML terminologies, the following terms are used:
- Contour application acts as the Service Provider, or SP in short
- Directory services acts as the Identity Provider, or IdP in short
Pre-requisites
Basic SAML specification and security requirements to be compliant with Contour SSO:
- Identity Provider (IdP) supports SAML 2.0, e.g. Microsoft Active Directory Federation Services (AD FS) or Azure Active Directory (AAD)
- The entire SAML message must be signed. Signing the SAML assertions only is insufficient, and will result in a 400 Bad Request response
- No assertion encryption
- The SAML protocol version is
urn:oasis:names:tc:SAML:2.0:protocol - The NameID format is
urn:oasis:names:tc:SAML:1.1:nameid-format:emailAddress - The IdP response status code must be
urn:oasis:names:tc:SAML:2.0:status:Success - The IdP response
NotBeforeandNotOnOrAfterassertion timestamps must consider system clock skew and must be set to at least one(1) minute before and one(1) minute after the current time (this particularly concerns AD FS default settings) - The SignatureMethod algorithm is http://www.w3.org/2001/04/xmldsig-more#rsa-sha256
- The DigestMethod algorithm is http://www.w3.org/2001/04/xmlenc#sha256
Create SP Signing Key
Contour requires signing the SAML Audentication Request, therefore a signing key needs to be created and uploaded to Contour web-application Cloud server directory. e.g. a sub-directory called /app/saml.jks.
A signing key can be created using keytool command. While please DO double check internally whether any internal requirements on signing key used for SAML integration. After create the key by below command, please share it to Contour Support team by raising ticket from Contour Support Portal. Contour support team will upload the key to your cloud node web server and let you know the directory.
Example command: keytool -genkey -v -alias contoursaml -keystore contoursaml.jks -keyalg RSA -keysize 2048 -validity 365
-alias: Alias Name for the key entry, you can change to your preferred name.-keystore: File name for the keystore file, you can change to your preferred name.-storetype: Recommend to usePKCS12, which is the industry standard format-keyalg: Algorithm to be used to generate the key, recommend to keep asRSA-keysize: Size of the key, recommend to keep as2048-validity: Validity of the keystore in days
(base) john@Admins-MacBook-Pro saml % keytool -genkey -v -alias contoursaml -keystore contoursaml.jks -keyalg RSA -keysize 2048 -validity 365

Enter keystore password:
Re-enter new password:
What is your first and last name?
  [Unknown]:  John Doe
What is the name of your organizational unit?
  [Unknown]:  Technology Services
What is the name of your organization?
  [Unknown]:  ABC Company
What is the name of your City or Locality?
  [Unknown]:  Singapore
What is the name of your State or Province?
  [Unknown]:  Singapore
What is the two-letter country code for this unit?
  [Unknown]:  SG
Is CN=John Doe, OU=Technology Services, O=ABC Company, L=Singapore, ST=Singapore, C=SG correct?
  [no]:  yes

Generating 2,048 bit RSA key pair and self-signed certificate (SHA256withRSA) with a validity of 365 days
    for: CN=John Doe, OU=Technology Services, O=ABC Company, L=Singapore, ST=Singapore, C=SG
Enter key password for <contoursaml>
        (RETURN if same as keystore password):
[Storing contoursaml.jks]

(base) john@Admins-MacBook-Pro saml % ls -la
total 8
drwxr-xr-x   3 john  staff    96 Jan 18 10:52 .
drwxr-xr-x  26 john  staff   832 Jan 18 10:51 ..
-rw-rw-r--   1 john  staff  2226 Jan 18 10:52 contoursaml.jks
Configure SP Metadata
Please raise ticket to Contour support team to grant the Node Admin user access to your accounts first.
Node admin user login to Contour Admin Console via
https://your-site-name/ui/nodeadmin/login
After login:
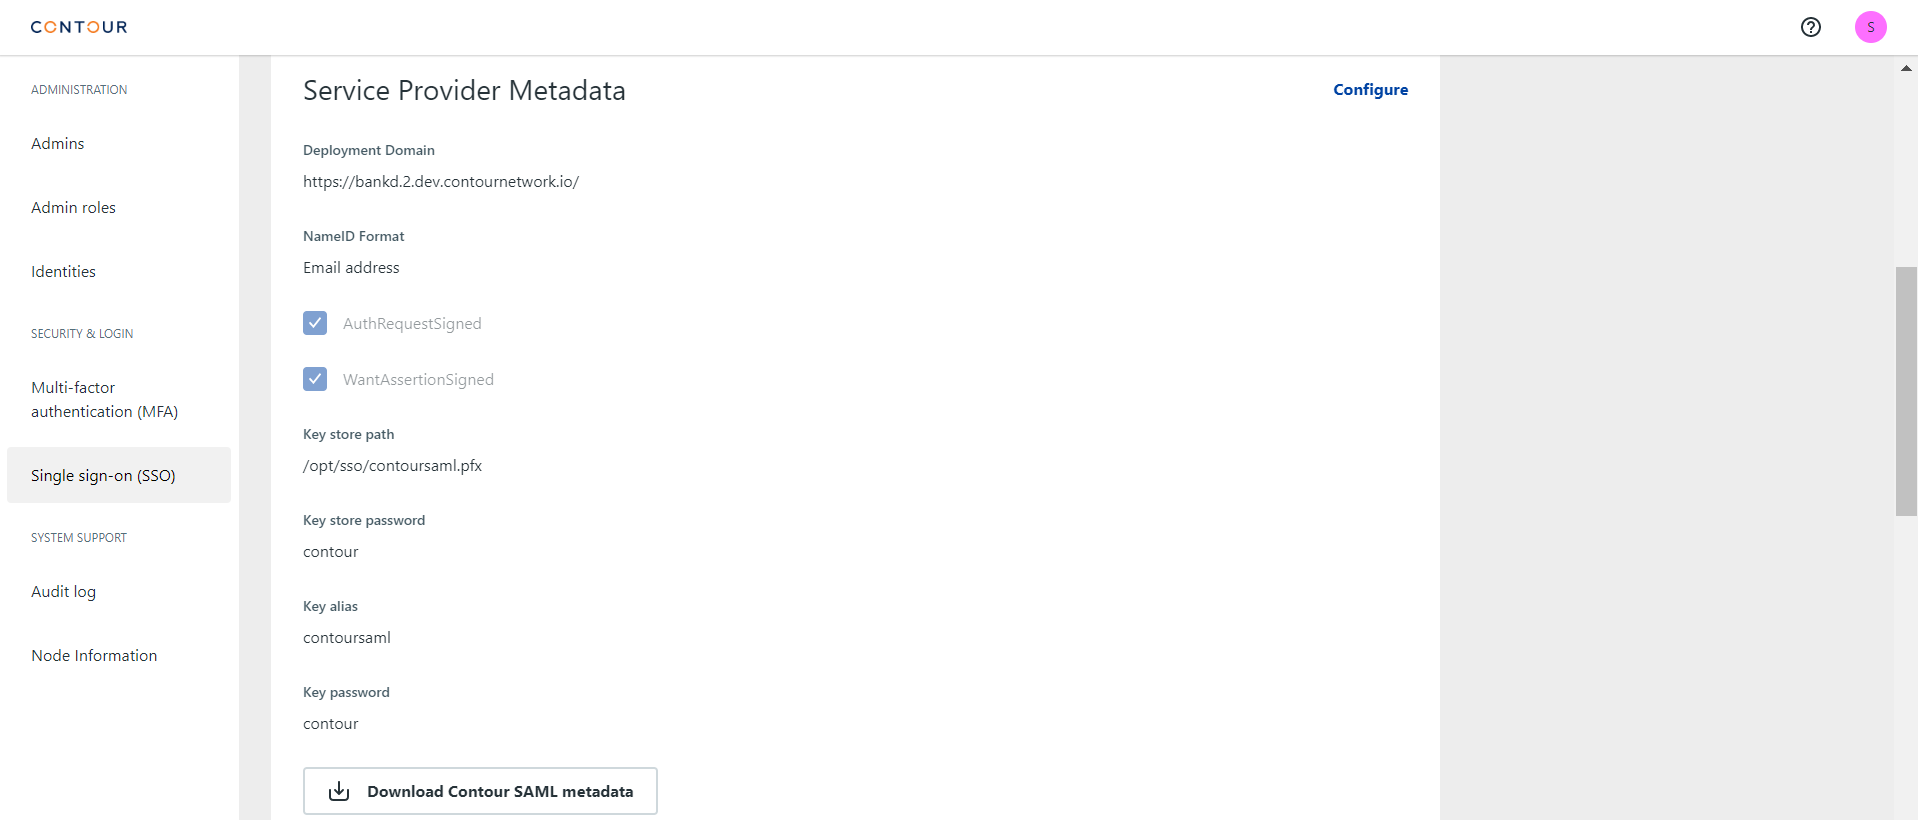
- Click on Single sign-on (SSO) at the side panel
- Click on
Configurein the Service Provider Metadata section - Fill up the form
Deployment domain: the full URL of your Contour web app, e.g.https://contour.abc.comNameID format,AuthRequestSignedandWantAssertionSigned: not editable with Contour requirements as described in Pre-requisites section aboveKey store path: the absolute path to the keystore file, e.g./app/saml.jkswith reference to the example in Create SP Signing Key section aboveKey store password,Key aliasandKey passwordas you defined in Create SP Signing Key section above
- Click on
Save - Download the Contour SP metadata file
The Contour SP metadata file can be shared to the Identity Provider (IdP) administrators (e.g. IAM team) in your company to configure the IdP to allow the SAML connection from Contour.
Receive IdP Metadata
After the Identity Provider (IdP) administrators (e.g. IAM team) in your company completed the IdP configuration to allow Contour SAML integration, you should receive the IdP metadata (e.g. an xml file) to proceed the configuration on Contour.
Configure SAML on Contour
To configure the SAML with IdP metadata, the action must be taken by 2 different Node admin users in a request-approve manner.
Part 1: First Node admin user (Request)
Proceed to configure the SAML integration with the IdP metadata received from your Identity Provider (IdP) administrators (e.g. IAM team), using the Sample IdP metada below as example:
- Click on Single sign-on (SSO) at the side panel
- The status is "Disabled"
- Click on
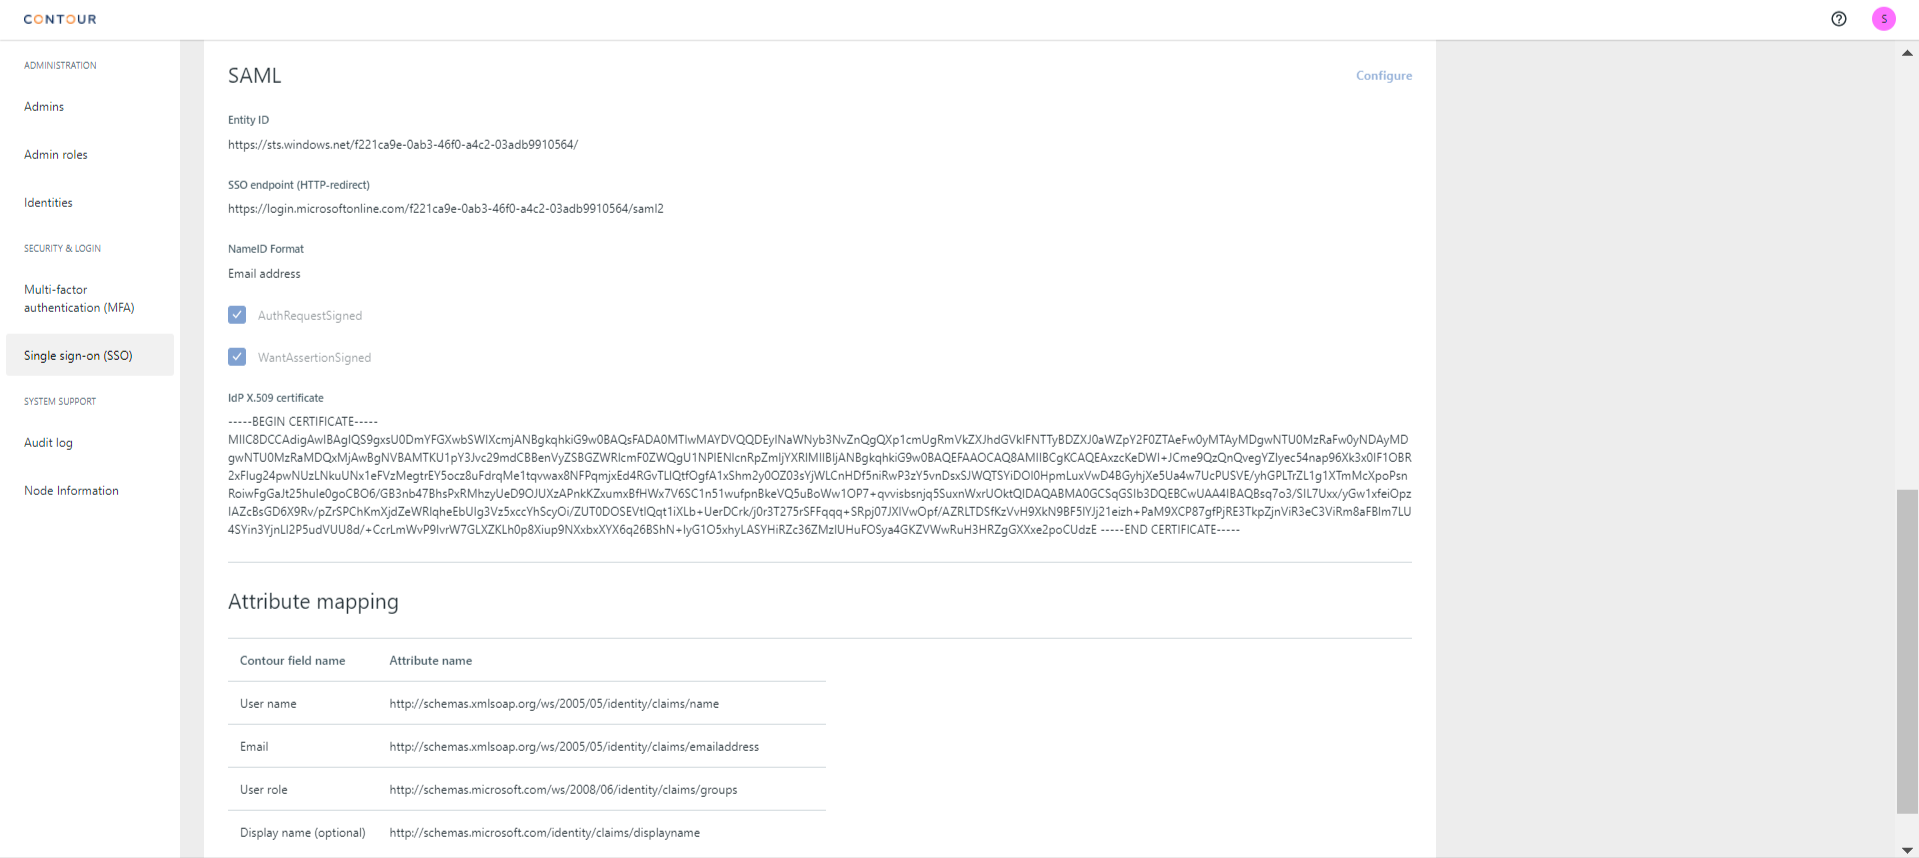
Configurein the SAML section - Select to set up the configuration using a "Metadata xml file upload" from Identity Provider (IdP) or "Manual configuration"
- If using the "metadata xml file upload", Contour automatically parse the file and pre-populate the configurations for "Entity ID", Single sign-on service endpoint", "IdP X.509 cert". Important to double-check the values against the IdP metadata file, especially the "IdP X.509 cert" should be exactly the same as the
Signature|signingkey with reference the sample IdP metadata below. - If "Manual configuration", specify the "Entity ID", Single sign-on service endpoint", "IdP X.509 cert"
- If using the "metadata xml file upload", Contour automatically parse the file and pre-populate the configurations for "Entity ID", Single sign-on service endpoint", "IdP X.509 cert". Important to double-check the values against the IdP metadata file, especially the "IdP X.509 cert" should be exactly the same as the
- Define the "Attribute Mapping" of Contour fields to the
Uriof the IdP attributes/claims, which should be included in the IdP metadata, with reference the sample IdP metadata below.User name: map to theUriof the desired "ClaimType", e.g.http://schemas.xmlsoap.org/ws/2005/05/identity/claims/nameEmail: map to theUriof the email address, e.g.http://schemas.xmlsoap.org/ws/2005/05/identity/claims/emailaddressUser role: map to theUriof the (AD) groups, e.g.http://schemas.microsoft.com/ws/2008/06/identity/claims/groupsDisplay name (optional): map to theUriof display name of user, e.g.http://schemas.microsoft.com/identity/claims/displayname
- Click on
Save
The request is now to be reviewed and approved by another Node admin user.
Sample IdP metadata

<Signature xmlns="http://www.w3.org/2000/09/xmldsig#">
  ...
  <KeyInfo>
    <X509Data>
      <X509Certificate> {{IdP Signing certificate}} </X509Certificate>
    </X509Data>
  </KeyInfo>
</Signature>

<KeyDescriptor use="signing">
  <KeyInfo xmlns="http://www.w3.org/2000/09/xmldsig#">
    <X509Data>
      <X509Certificate> {{IdP Signing certificate}} </X509Certificate>
    </X509Data>
  </KeyInfo>
</KeyDescriptor>

<auth:ClaimType xmlns:auth="http://docs.oasis-open.org/wsfed/authorization/200706" Uri="http://schemas.xmlsoap.org/ws/2005/05/identity/claims/name">
    <auth:DisplayName>Name</auth:DisplayName>
    <auth:Description>The mutable display name of the user.</auth:Description>
</auth:ClaimType>

<auth:ClaimType xmlns:auth="http://docs.oasis-open.org/wsfed/authorization/200706" Uri="http://schemas.microsoft.com/identity/claims/displayname">
    <auth:DisplayName>Display Name</auth:DisplayName>
    <auth:Description>Display name of the user.</auth:Description>
</auth:ClaimType>

<auth:ClaimType xmlns:auth="http://docs.oasis-open.org/wsfed/authorization/200706" Uri="http://schemas.xmlsoap.org/ws/2005/05/identity/claims/emailaddress">
    <auth:DisplayName>Email</auth:DisplayName>
    <auth:Description>Email address of the user.</auth:Description>
</auth:ClaimType>

<auth:ClaimType xmlns:auth="http://docs.oasis-open.org/wsfed/authorization/200706" Uri="http://schemas.microsoft.com/ws/2008/06/identity/claims/groups">
    <auth:DisplayName>Groups</auth:DisplayName>
    <auth:Description>Groups of the user.</auth:Description>
</auth:ClaimType>
Part 2: Second Node admin user (Check)
- Click on Single sign-on (SSO) at the side panel
- Click on
Approve
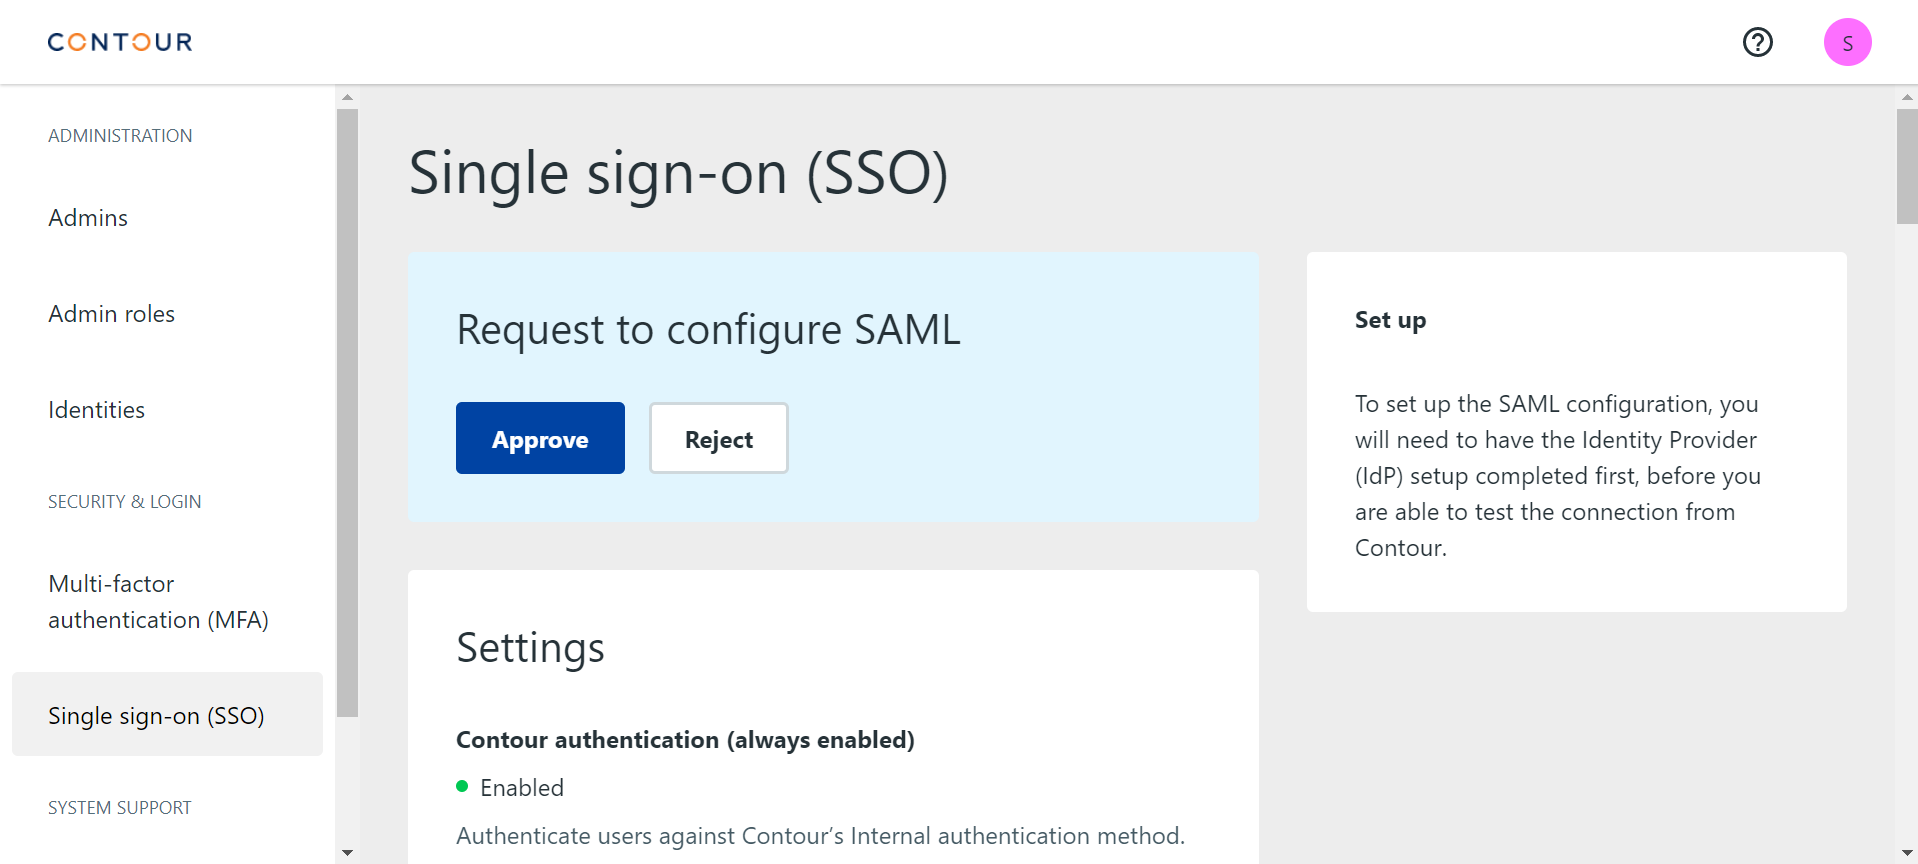
The status is now changed to "Enabled". The Single sign-on (SSO) via SAML2.0 is now effective.
Map LDAP group ID for user role
Add or Edit the LDAP group ID of an administrator role
For SSO to work correctly, each role in Contour should be linked to the corresponding group in your company's AD system. To add or edit the LDAP group ID of an administrator role (Node or Identity administrators), please login to admin console by Node administrator -
Part 1: First Node administrator (Request)
- Click on Admin roles at the side panel
- Click into the admin role under "Roles" tab, then
Edit LDAP group ID - Update the value accordingly
- Click on
Save
The role update is now pending a second administrator to review and approve. The role is still listed under the "Roles" tab since the role remains active.
Part 2: Second Node administrator (Approve)
- Click on Admin roles at the side panel
- Click on Requests tab.
- Under the Requests received section, click on the newly edited user role, and review
- Click on
Approve
Add or Edit the LDAP group ID of an transaction role
Identity Admin login to application -
Part 1: First Identity administrator (Request)
- Click on
 on the top right, then "User roles"
 - Click into the role name, then click
Edit - Update the value for
Map to LDAP groupaccordingly - Click on
Update
The role update is now pending a second administrator to review and approve. The role is still listed under the "User Roles" tab since the role remains active.
Part 2: Second Identity administrator (Approve)
- Click on on the top right, then "User roles"
- Click on Pending tab.
- Under the Requests received section, click on the newly edited user role, and review
- Click on
Approve
The SSO user role mapping is complete, user login authentication is by your AD now.