Deploying Contour 8.0
You can request the Contour installation package via the Contour Support Portal.
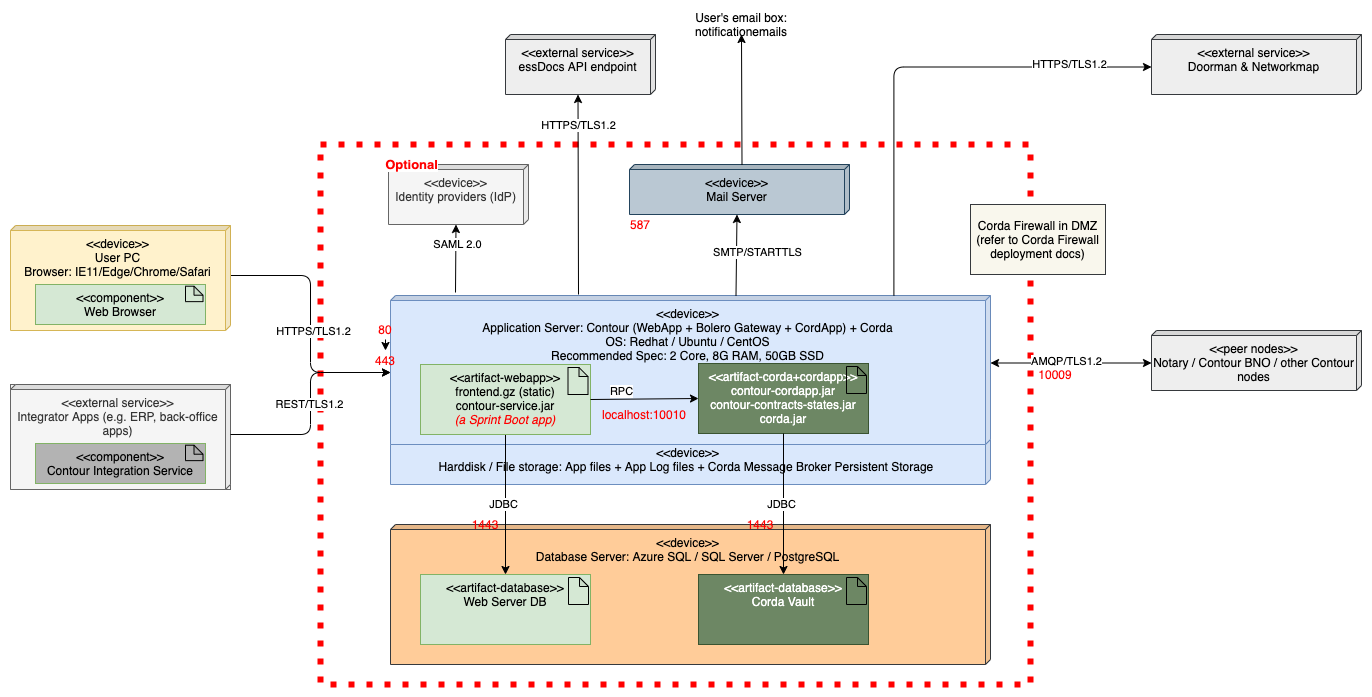
Deployment Diagram
Overview of the deployment and components as shown in the diagram below.
- Application Components - which can run on same server or 2 different servers
- Contour Web App: a Spring Boot application
- Corda + Contour CorDapp
- Databases - 2 databases which can be on same server
- Database for Contour Web App
- Database for Corda and Contour CorDapp
Step 1. Prepare
1.1 Pre-requisites
-
Provision one (1) or two (2) servers (e.g. VMs). Recommended spec:
- OS: Ubuntu 14/16 or RHEL 7
- CPU: 2 (v)Core or more
- RAM: 8G RAM or more
- Disk: 50G or more
- Java 8 JDK. Install the Java 8 JDK. Corda requires at least version 8u171, but do not currently support Java 9 or higher for this version of Corda. Verify java version with command:
java -version. Corda has been tested against the following Java builds:
-
Provision two (2) Databases, create DB account with READ/WRITE access. Database types supported:
- PostgreSQL 10 or later; or
- SQL Server 2014 / 2017 / 2019
-
Provision one (1) SMTP account for email notification
-
Make sure firewall rules have been configured to allowed the required network connections as detailed in Network Connections / Firewall Rules
1.2 Download & Prepare Package
- Pull Contour installation v8.0 package (e.g.
contour-8.0.0.zip) onto the destination server - Upzip the package (e.g. to directory
~/contour-8.0.0/), which contains:
~/contour-8.0.0
|-- api-service/    # installation files for Contour Web App
|-- corda/          # installation files for Corda and Contour CorDapps
|-- Corda Enterprise 4.8.6   # Corda Enterprise packages, incl. Corda Firewall
1.3 Get node X500 ready
Raise support ticket with below information for your node X500 pre approval
- X500 name in plain text format. Please refer to allowable identity name.
- Node company registered address
Contour support will raise the request to Corda Network Foundation (CNF) for X500 pre approval and inform you once approved.
1.4 Sanity check on infra layer
Prior to starting the Corda Node setup, it's recommended to check all the connectivity described in Network Connections / Firewall Rules.
- Contour network / BNO
- Notary
- Corda Network Map
- Corda Network Doorman
- Certificate Revocation List(crl) Endpoint
Step 2. Install Corda & CordApp
2.1 Install Corda 4.8.6
You can skip this step if running Contour CorDapp on an existing Corda Node.
- Copy & paste the entire v8.0 package
corda/directory to the desired installation path, e.g./opt/corda. => Copy & paste entiry directory from~/contour-8.0.0/cordato/opt/corda; - Change working directory to the Corda installation directory, e.g.
cd /opt/corda; - Update the Corda node configurations, with reference to Corda Node Config;
- Change working directory to the
certificatessub-directory, e.g.cd /opt/corda/certificates;- there are two (2) trust root files from the Certificate Authority (CA, a.k.a Doorman) in different Corda Network
cn-prod-truststore.jksfor Corda Network Prodcn-preprod-truststore.jksfor Corda Network Pre-prod
- Change working directory back to Corda installation directory, e.g.
cd /opt/corda/. Raise Certificate Signing Request (CSR) by doinginit registrationand specify the right trust root to the Corda Network the node is joining. E.g.- Command to join Corda Network Prod:
java -jar corda-4.8.6.jar initial-registration --network-root-truststore certificates/cn-prod-truststore.jks --network-root-truststore-password trustpass - Command to join Corda Network Pre-prod:
java -jar corda-4.8.6.jar initial-registration --network-root-truststore certificates/cn-preprod-truststore.jks --network-root-truststore-password trustpass
- Command to join Corda Network Prod:
- Raise a ticket to Contour Support to request CSR approval from Corda Network Foundation (CNF), by specifying the request ID. E.g.
9309e1ef-038f-444b-9df3-b6e8b7726c11in this example.
Running Corda Init Registration Flow..
Getting Request ID..
Getting Request ID..
Getting Request ID..
Getting Request ID..
Getting Request ID..
Init Registration Request sent, ID: 9309e1ef-038f-444b-9df3-b6e8b7726c11
Please contact CA to approve your request,
The Init-Registration proccess(pid:) is running in background, please run this script again
The Corda node will keep pulling the CSR approval from Doorman. Upon approval, the Corda node will terminate automatically.
2.2 Install Contour v8.0 CorDapps
- Copy & paste the entire v8.0 package
/corda/cordapps/directory to your existingcorda/installation directory, e.g. from~/contour-8.0.0/corda/cordappsto/opt/corda/cordapps - Change working directory to the Corda installation directory, e.g.
cd /opt/corda/cordapps - Update the Contour CorDapp configurations under the
cordapps/cofigdirectory, e.g./opt/corda/cordapps/contour-cordapp-8.0.0.conf, with reference to Contour CorDapp Config - Update the config file for
corda-tools-metering-collector-<newversion>.jar, by copy and paste from Contour release packagecontour-8.0.0/corda/cordapps/config, refer to Contour Corda Config for more details about the configuration parameters - Change working directory back to Corda installation directory, e.g.
cd /opt/corda/; - Start the Corda node, e.g. command
java -jar corda-4.8.6.jar --base-directory /opt/corda --config-file /opt/corda/node.conf
2.3 Check Network Connection to Contour BNO
This step is to test the network connection from your Corda node to Contour Business Network Operator (BNO), before the next step.
This requires using the Corda Node Shell, to manually trigger a Ping flow that Contour have introduced with the contour-business-tools-<version>.jar.
- Connecting to the Corda Shell using the command
ssh -p [sshd portNumber] [rpc username]@[host, e.g. localhost]- e.g.
ssh -p 2222 cordau@localhost
- e.g.
- Key in rpc userpassword as specified in the
node.conf - Run the command
flow list, which lists out all the Corda flows available in thecordapps - Run the command
flow start network.contour.app.flow.SinglePingFlow$Initiator target: "<Contour BNO x500Name>", e.g.- For Contour Prod:
flow start network.contour.app.flow.SinglePingFlow$Initiator target: "OU=Trade Finance, O=Global Trade Network, L=Singapore, C=SG" - For Contour Staging:
flow start network.contour.app.flow.SinglePingFlow$Initiator target: "OU=Contour BNO, O=Contour Pte. Ltd., L=Singapore, C=SG"
- For Contour Prod:
- If the network connections have configured properly, the
Pingflow will comeplete successfully with example output as below.- If the
Pingflow fails, please check again the necessary network connection requirements as described in Network Connections / Firewall Rules
- If the
Mon Dec 14 03:34:07 UTC 2020>>> flow start network.contour.app.flow.SinglePingFlow$Initiator target: "OU=Contour BNO, O=Contour Pte. Ltd., L=Singapore, C=SG"

 ✓ Starting
 ✓ Start the ping.
 ✓ Receive the ping.
▶︎ Done
Flow completed with result: OU=Contour BNO, O=Contour Pte. Ltd., L=Singapore, C=SG.name has received ping at 2020-12-14T03:36:10.853Z
ping target OU=Contour BNO, O=Contour Pte. Ltd., L=Singapore, C=SG time elapsed = 97 ms
Step 3. Install Contour Web App
Please proceed to install Contour Web App, after the Corda node and Contour CorDapps ready as desribed in Step 2.
- Copy & paste the entire v8.0 package
api-service/directory to the desired installation path, e.g./opt/api-service. => Copy & paste entiry directory from~/contour-8.0.0/api-serviceto/opt/api-service; - Change working directory to the WebApp installation directory, e.g.
cd /opt/api-service; - Update the Contour Web App configurations, e.g.
/opt/api-service/application.properties, with reference to Contour Web App Config; - Update the bootstrap file,
/opt/api-service/bootstrap.json, with reference to Contour Bootstrap Web App - Start the Contour Web App, e.g. command
java -jar contour-service-<version>.jar
Now, the Contour Web Application should be up and running.
- the
nodeadminusers specified in thebootstrap.jsonshould receive their account activation email
Note When setup HTTPS for the web, it's recommended to use reverse proxy like NGINX to serve the frontend static page, but not the springboot (Contour service).
Step 4. Request new identity
You can request to create identity under the node via the Contour Support Portal with below infomation.
- The node name or node X500 name under which the new identiy will be created
- Identity name
- Company legal name
- Identity registered address
- Location / City and Country
- Technical contact email (optional)
- SWIFT/BIC code or LEI code (optional)
Contour support team will inform you once the new identity is ready to use.
Step 5. Get the Node and Identity ready
Follow the Quick Start Guide to ready the node for transaction.